
We had an interesting start today to say the least.
The past few mornings with potty training I've noticed that Ryan has been doing his number twos in his nappy before Matt or myself get out of bed, so I had the brilliant idea to get him into pants as soon as possible so his only option was to use his potty that we had sitting in our bedroom. Around half-five, Ryan came into the bedroom and climbed into my side of the bed asking for a cuddle. He stayed there until disappearing sometime between 8 and ten to nine. When he returned I called him over to get him into his clean Thomas pants before turning on his bedroom light to give him time to play...and hopefully poop, reminding him, of course, that the potty was just there in our room.
Imagine my joy and surprise when just moments later he returned, pants round his ankles, waddling determined towards the potty. I was praising him with an enthusiastic "well done" when I smelt it. Immediately I squeaked and raised the level of congratulations, telling him I was SO proud he was doing a poo on the potty! FINALLY! He got it!!
Pleased with my idea to get him into his pants first thing, I began to get out of bed to tend to him when I noticed something on his hand as he smeared it down his leg. Worriedly I turned on the bedroom light and realised he had, unfortunately, not made it in time, really, as I witnessed a mess before me to clean up...complete with trail of "plops" from his bedroom door where he initially began to disrobe.
'It could have been worse,' I kept reminding myself as I distinctly remember a time when my twin brother and sister first discovered they could remove their own nappies. That was the time they "painted" a mural on my parents' STUCCO bedroom walls from their cots...with finishing touches on each other! So yes, it could have been worse. MUCH worse.
Needless to say it took a bit to get everything cleaned up, but once the major bits of mess were cleaned the power shower worked a treat for finishing the job.
Parent Lesson Learnt: Monitor toddler very closely in the morning once placed in his pants.

This evening brought a treat with another 3-star behaviour day, despite no nap. Matt got out something he has been dying to try with Ryan, which was given to him last Christmas by his Nan & Grandad - his JCB Backhoe Loader! It came complete with working, plastic screwdriver!

Ryan was just as chuffed as Daddy to finally get this out of the box, but we think the lack of nap and time of day combination may have been what led to his VERY short attention span. He lasted about 3 minutes into assembly before the distractions and silliness hit. While I know Matt was disappointed a bit because he was saving this as a "Daddy & Ryan" project, he did consider the factors which made Ryan less than enthusiastic and focused on their task at hand.
I suppose one benefit to not having any nap is that we were almost guaranteed our tyke would go down tonight without much fuss. Truth? Like. A. Brick. He was spark out before I finished his third song request. I suppose it's only a good thing because he could do with getting back in the swing of a decent bedtime before Matt and I both return to work.
Now, while this would have been where I ended my blog post, I have decided to carry on briefly to share something I have only just learnt to do. Many months back I had a reader message me that someone had "stolen" some of my images of Ryan. They sent a link to this person's Facebook and sure enough there they were, publicly on display. Not only did they have photos of Ryan as a baby (obtained from my previous blog posts), but it looked like some of several different children.
Well, some people may have immediately put their blog on lock-down, but since I know I have a decent reader base, I decided to leave it public, but instead, begin watermarking my photos. After watching several tutorials, which you can easily find on You Tube, I have found a pretty straightforward way and I've decided to share my knowledge to anyone who may be interested. While this will not keep any future photos from being taken, it may deter people as there is an identifying "mark" embedded in the photo, which would be quite cumbersome to edit out.

My directions are for use in Photoshop CS3, however, it can be used generally the same I would imagine for most editions. Otherwise, a You Tube search should sort it for you. So, in the meantime, let's begin!
First, upload your photo into Photoshop. Next, select the 'text' tool and place the cursor on your page to begin typing. (Make sure the filler colour is set on white.) To get the copyright (c) you can try holding the ALT key and typing the numbers 0, 1, 6 and 9, or if that doesn't work, just find it in another piece of text and copy and paste.
As you can see, for my text I have used my web address for my blog. All this does is alert anyone that this photo was obtained FROM my actual blog, but you can use any company name or handle you wish. Also, you can use any font you wish and place the text anywhere, I chose 'Impact' font and I prefer to place my text within my image so it cannot simply be cropped out.

Now, if you noticed the text is white and blaring in the photo and in order to make it less intense, you have to reduce the opacity. In the menu on the right, reduce the opacity to your liking. I generally stick with about 50%.

From there, click on the 'fx' symbol at the bottom of that same menu and another drop down menu will appear. Click on 'drop shadow.' This means your logo or symbol will stand out a bit in terms of clarity without being so intrusive.
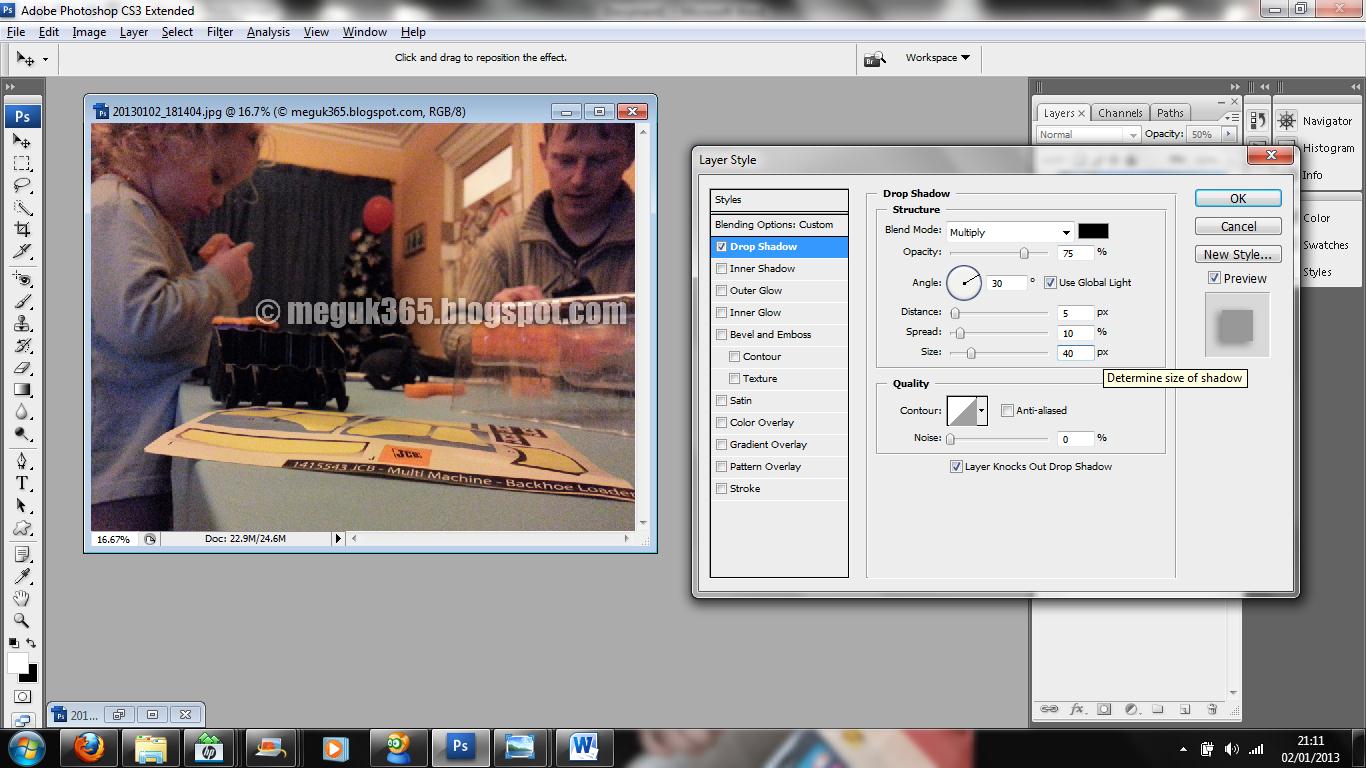
A window will open then, giving you a few choices to edit. You can leave it as is, but I choose to change three of the settings of distance, spread and size to about 5, 10 and 40.

After that, you can change the 'fill' of the text between 25-50%, which dims the text just a bit more. It's up to you how clear you want it to appear through your picture. I like mine to be faint, but still legible and "annoying" enough so that someone wouldn't want to take my photo.

Finally, if you click on the 'Background' layer and select 'flatten image' it will reduce the layers back down to one and you can save the image as it is from there.
I'm sure some may have simpler methods for doing this, but I felt this produced the best result for what I was looking for. At least now I can feel comfortable that my images, especially ones of my little love, are protected, as they should be.


No comments:
Post a Comment